


Arbin continues to power innovation in many areas of battery research, including electrochemical experiments such as cyclic voltammetry (CV). Arbin equipment is designed to perform electrochemical experiments with the precise circuitry required for linear voltage ramps, while the MITS software gives the user a wide variety of options to create test schedule profiles.
Understanding the various methods of creating CV test profiles with the MITS-Pro software will allow you to utilize the tools available in the Arbin's robust toolbox. There are two main ways to create a cyclic voltammetry test profile using the MITS-Pro software.
-
The Voltage Ramp Control Type
-
The CV control Type
General Tips
· Regardless of the CV method you choose to employ, it is good to set the safety limits of the test in the schedule file’s global tab.
· As a good practice start your test schedule with a rest step to serve as an OCV measurement. This first data point can give you invaluable information about the test performed, especially if you are troubleshooting the test in the event of an unexpected result.
· Unless you know how much current your particular experiment will require, start your cyclic voltammetry schedules in the high current range. If you want to suppress noise in the collected current data, then try with lower current ranges.
1. The Voltage Ramp Method
A typical cyclic voltammetry profile will include the following:
· An initial rest step
· A voltage ramp up
· A voltage ramp down
· A loop step
Hints: When creating CV test schedules with the voltage ramp control type you may take advantage of the Meta variable functionality in the MITS software to prevent current spikes in your data.
Start by creating a rest step to serve as an OCV measurement. Choose the step limit to be five seconds.

Figure 1 - Creating a rest step
Next create a voltage ramp step. It is desirable to select the last step channel voltage as the starting voltage of the ramp. To do this left click in the Starting Voltage field and then right click on Meta Variables to pull up the Meta Variables window.
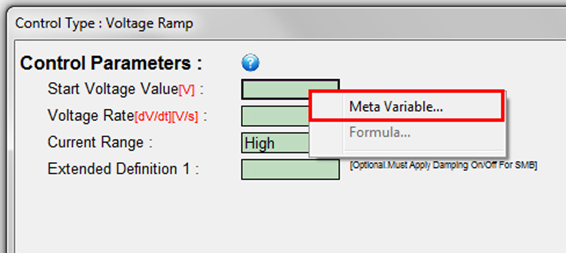
Figure 2 - Right click inside the Start Voltage Value field and then left click Meta Variable
When you have the Meta variables window open, select the type to be Last Step Values. Next, click CHAN_voltage and then click ok.
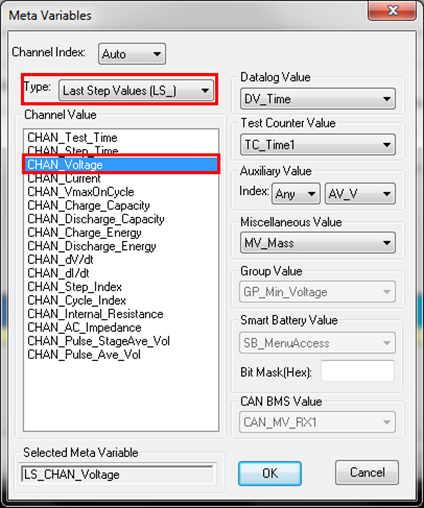
Figure 3 - Choosing the last step channel voltage to be the starting voltage of your voltage ramp
Finish by selecting the desired slope for your voltage ramp, as well as appropriate logging parameters. For illustration purposes the step limit has been chosen to be 4 volts.
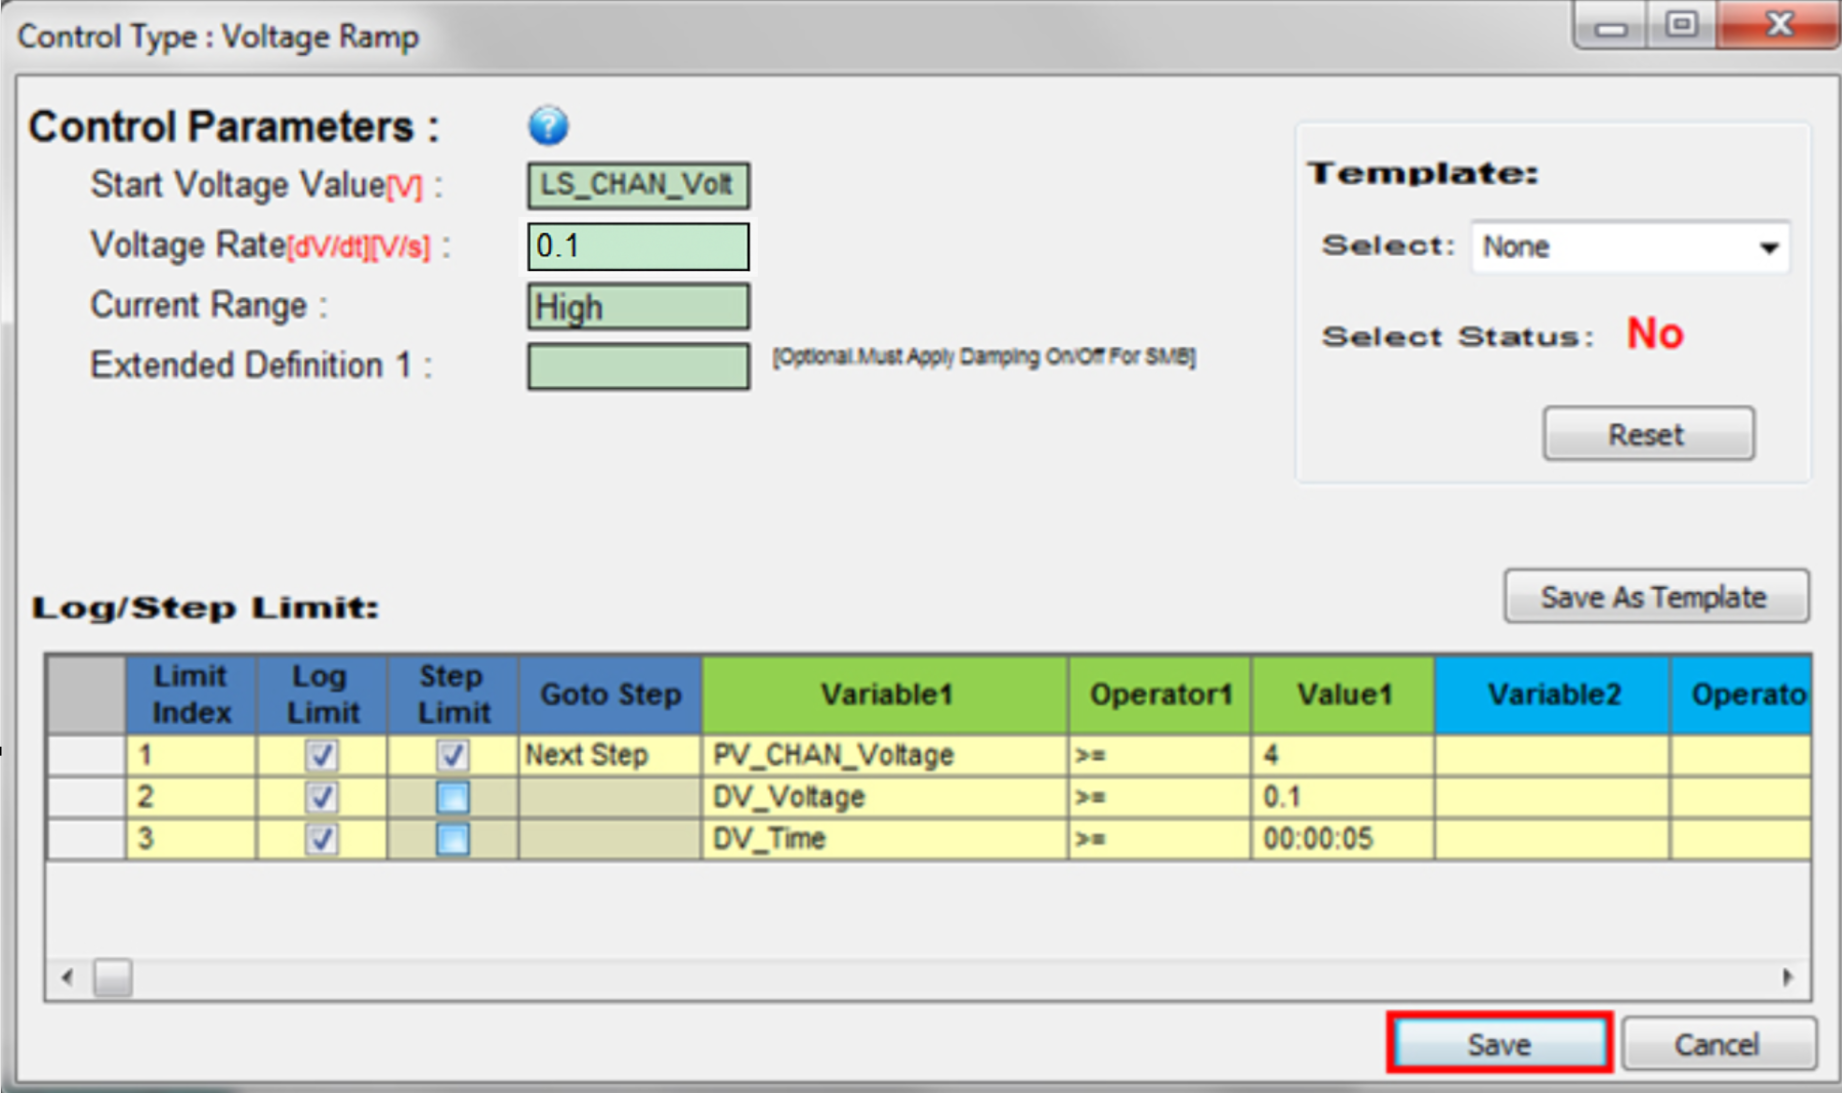
Figure 4 – Creating a positive voltage ramp
Now we must use voltage ramp to bring the voltage down to a specific value. We do this by creating another voltage ramp. Like before, choose the last step channel voltage to be the starting voltage and choose appropriate logging parameters. Instead of a positive slope we choose a negative slope. For illustrative purposes the step limit is 2 volt
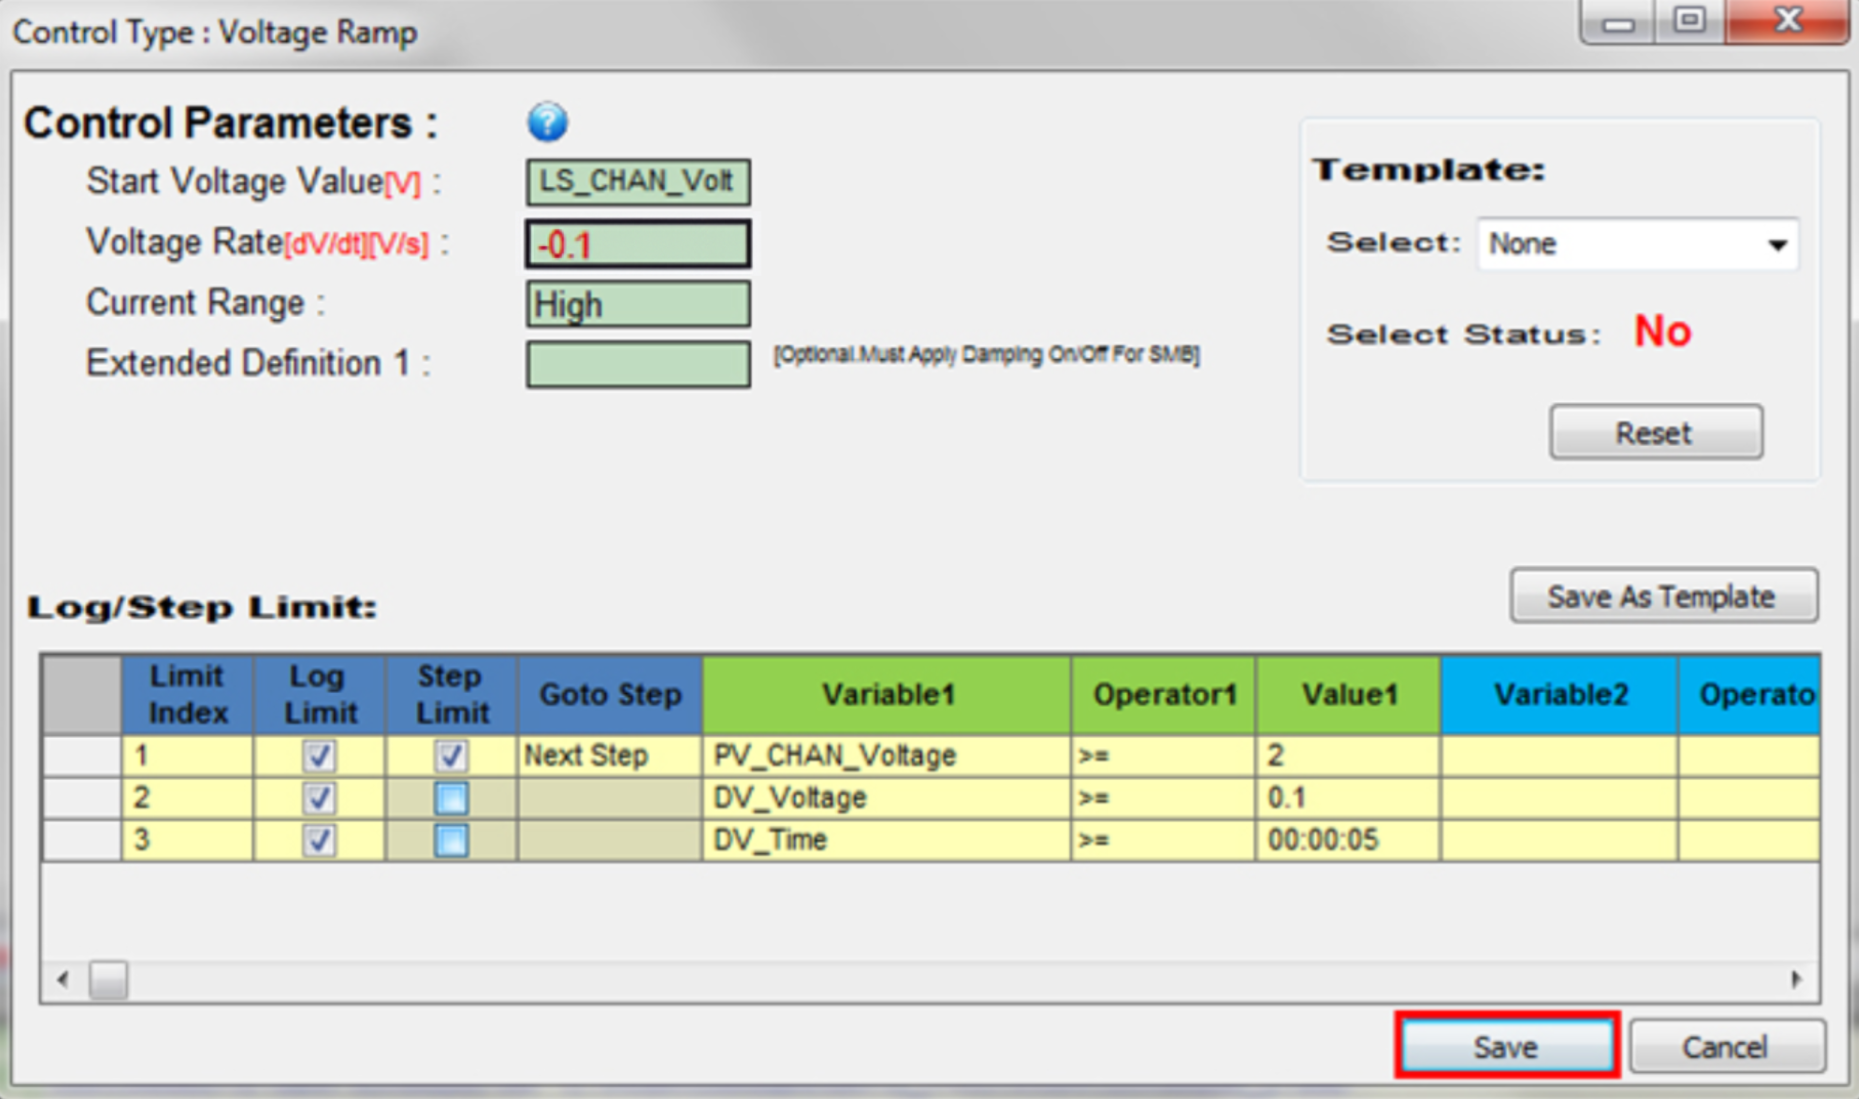
Figure 5 - Creating a negative voltage ramp
Finally, create a loop with set variables control type. Reset critical variables such as charge/discharge capacity. Then choose to increment the cycle index. Finally, set your step limit to the number of loops you want the software to perform. Remember that MITS test begins with cycle index counter as 1. Therefore if you want your test to loop 99 times, set the index counter to 99.

Figure 6 - Reset the variables that pertain to your experiment
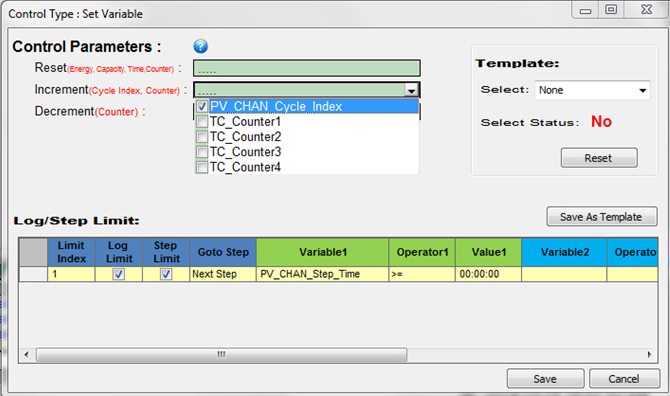
Figure 7 - Increment the cycle index
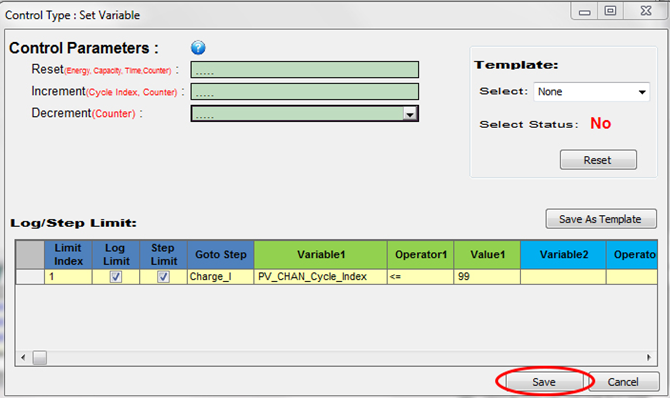
Figure 8 - Set the step limit to the desired number of loops
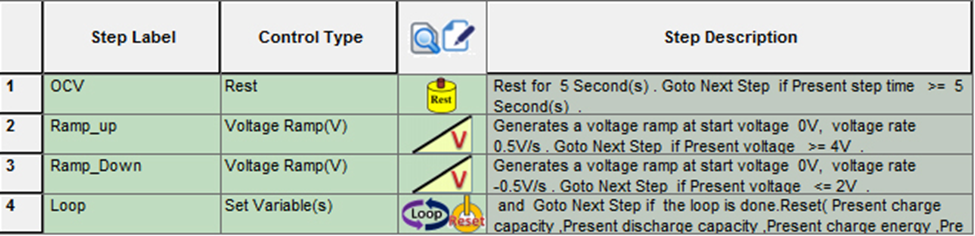
Figure 9 - The finished CV profile using the voltage ramp control type
2. The CV Control Type Method
An alternative to the voltage ramp method is to utilize the Voltage CycleV control type, which uses cyclic voltammetry profiles defined in the CV tab. The CV tab gives you a quick, simple, and effective way to create cyclic voltammetry profiles, and provides a nice preview of the profile you created. One of the distinct advantages of this method is that you can control how the machine updates the voltage bit by bit. To do this you will have to choose an appropriate step size or “Time increment-s.
Begin your test schedule with a rest step and then create a step using the CV control type. Next, select the edit/view button next to the cyclic voltammetry profile field. This will automatically open the CV tab where you can easily create a cyclic voltammetry profile. Don’t forget to save your profile once you have finished editing it.
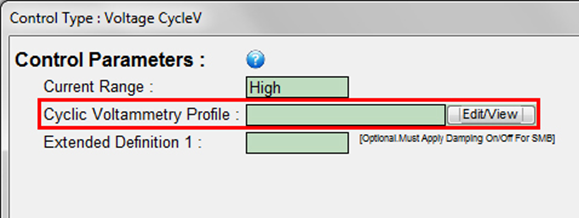
Figure 10 - Selecting edit/view to create a new CV profile
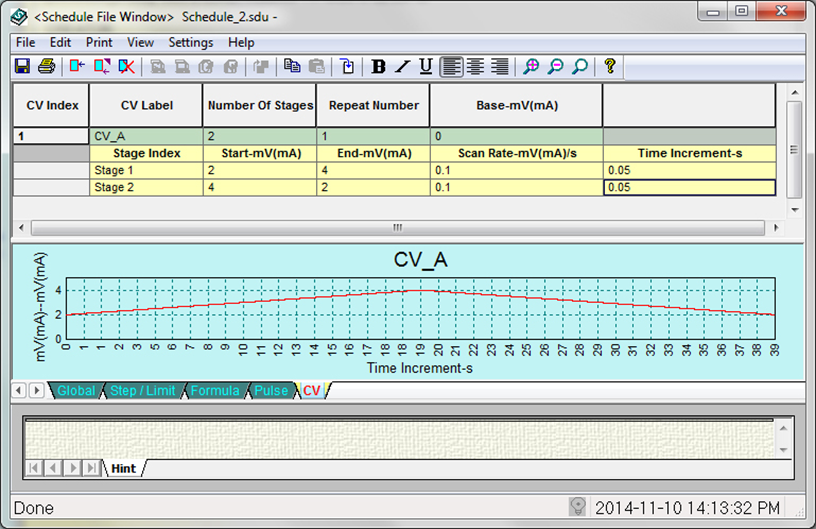
Figure 11 - An example of a CV profile designed using the CV tab
A large collection of useful information regarding test schedules is available in the form of online training videos on the Arbin website. You can access the videos after creating a user profile on the Arbin website. Battery Test Equipment | Arbin Instruments . For additional support, tips, or advice please contact Arbin Technical Support at [email protected] 979-690-2751.
Reference: Cyclic voltammetry

